
-
[Spring] 네이버 도서 검색 API 활용하기Spring 2023. 4. 22. 04:48
네이버 도서 검색 API 활용하기
본 포스팅에서는 네이버 도서 검색 API를 활용하여 client 측에 도서 데이터를 전달하는 서비스를 구현할 것이다.
client 측은 thymeleaf template, server 측은 springboot를 사용하였다.

- 네이버 개발자센터에 애플리케이션 등록
- 요청 URL 생성
- HttpURLConnection으로 데이터 요청하기
- 응답 데이터 읽어오기
- JSON 파싱하기
- DTO 구현
- Controller 구현
- template 구현
- javascript 구현
1️⃣ 네이버 개발자센터에 애플리케이션 등록
NAVER Developers
네이버 오픈 API들을 활용해 개발자들이 다양한 애플리케이션을 개발할 수 있도록 API 가이드와 SDK를 제공합니다. 제공중인 오픈 API에는 네이버 로그인, 검색, 단축URL, 캡차를 비롯 기계번역, 음
developers.naver.com
Naver Developers > Application > 애플리케이션 등록 (API 이용 신청)

* 나는 port 번호를 8081로 설정했다.
등록을 마치면 네이버에서 부여받은 Client ID와 Client Secret이 뜬다.
이제 이 정보들을 통해 API를 요청 할 것이다.
2️⃣요청 URL 생성
검색 > 책 - Search API
검색 > 책 책 검색 개요 개요 검색 API와 책 검색 개요 검색 API는 네이버 검색 결과를 뉴스, 백과사전, 블로그, 쇼핑, 영화, 웹 문서, 전문정보, 지식iN, 책, 카페글 등 분야별로 볼 수 있는 API입니다.
developers.naver.com
위 document를 참고하여 입맛에 맞게 요청 URL을 생성하면 된다.
요청 URL 나는 검색어(query)를 통해 JSON 형식으로 데이터를 받고 싶기 때문에 아래와 같이 요청 URL을 생성하였다.
String encodedKeyword = URLEncoder.encode(keyword, "UTF-8");
String apiURL = "https://openapi.naver.com/v1/search/book.json?query=" + encodedKeyword;
URL url = new URL(apiURL);
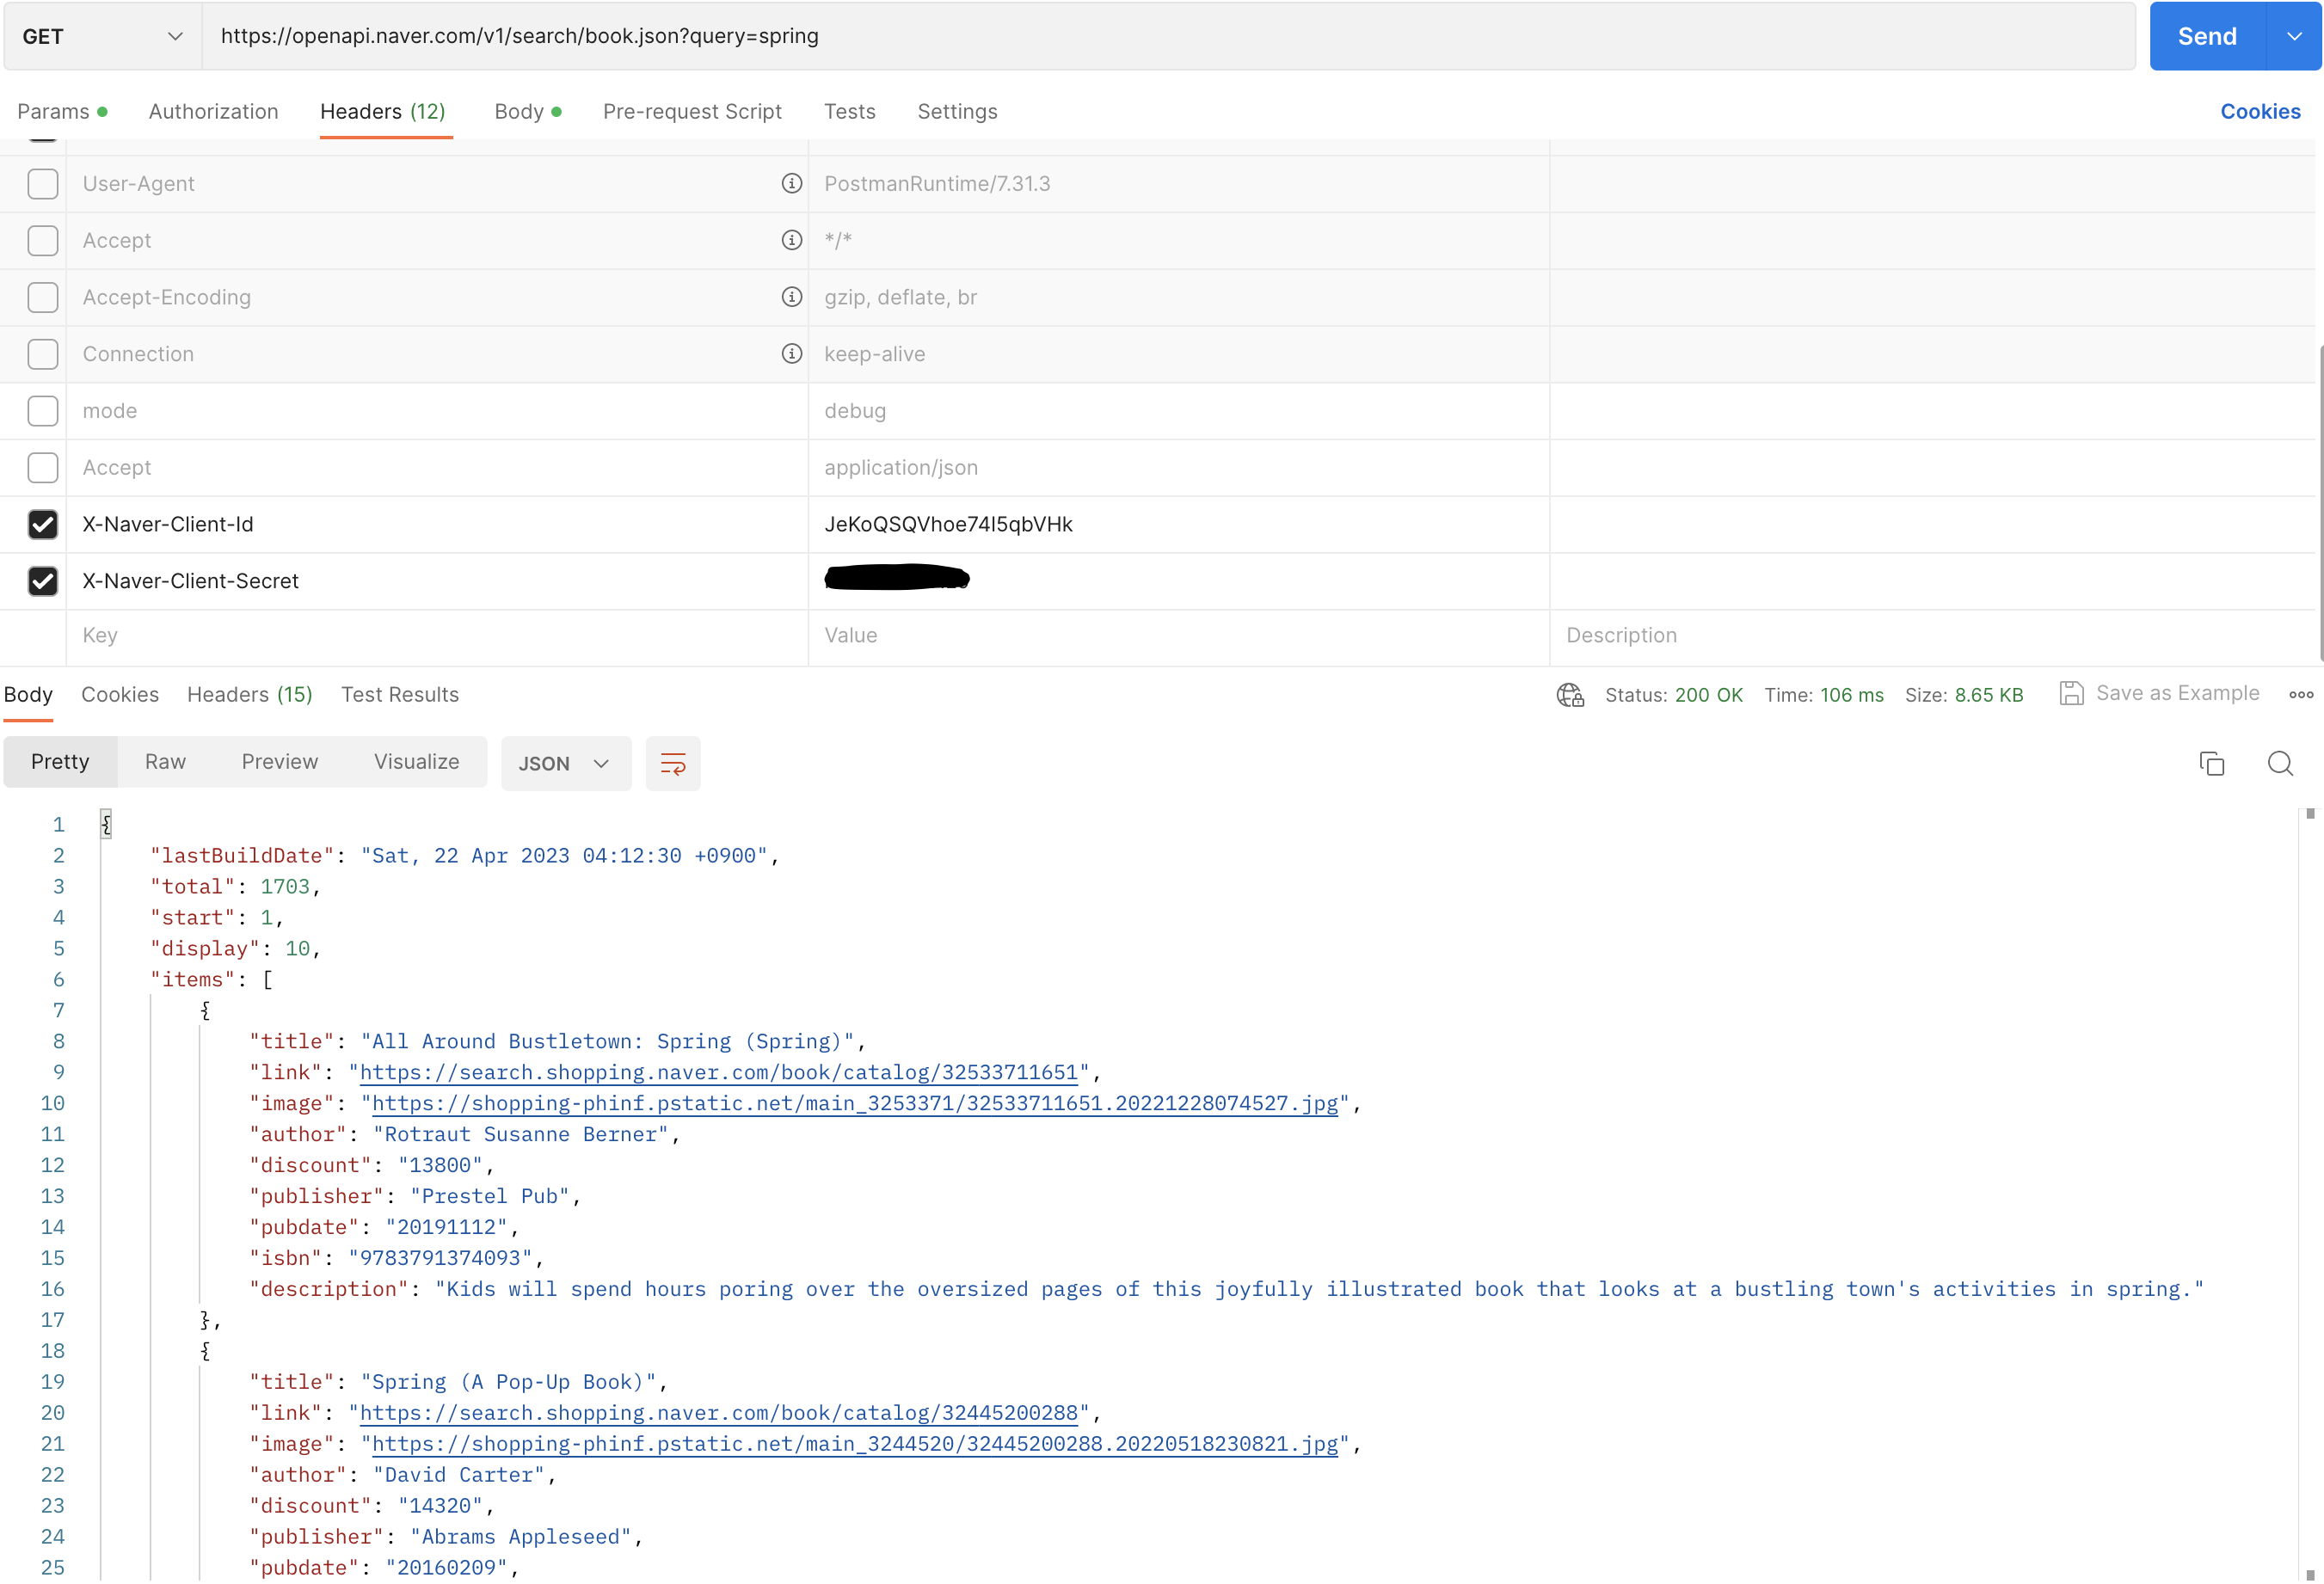
3️⃣ HttpURLConnection으로 데이터 요청하기
HttpURLConnection con = (HttpURLConnection) url.openConnection();
con.setRequestMethod("GET");
con.setRequestProperty("X-Naver-Client-Id", CLIENT_ID);
con.setRequestProperty("X-Naver-Client-Secret", CLIENT_SECRET);
새로운 HttpURLConnection을 생성하여
Http Header에 CLIENT_ID와 CLIENT_SECRET을 넣어준다.
private final String CLIENT_ID = "발급받은 CLIENT_ID";
private final String CLIENT_SECRET = "발급받은 CLIENT_SECRET";
나는 이런식으로 final 변수를 선언해주었다.
* postman으로 test 했을 때 정상적으로 데이터가 반환되는 것을 확인할 수 있다.
4️⃣ 응답 데이터 읽어오기
int responseCode = con.getResponseCode();
BufferedReader br;
if (responseCode == 200) { // 정상 호출
    br = new BufferedReader(new InputStreamReader(con.getInputStream()));
} else {  // 에러 발생
    br = new BufferedReader(new InputStreamReader(con.getErrorStream()));
}
String inputLine;
StringBuffer response = new StringBuffer();
while ((inputLine = br.readLine()) != null) {
    response.append(inputLine);
}
br.close();
responseCode가 200이면 요청이 성공적이었음을 나타내고, 다른 코드는 오류가 발생했음을 나타낸다.
응답 코드가 200이면, BufferedReader 객체를 만들어 con.getInputStream() 메서드에서 입력 스트림을 읽는다.
응답 코드가 200이 아니라면, con.getErrorStream() 메서드에서 오류 스트림을 읽는 새로운 BufferedReader 객체를 만든다.
그런 다음, BufferedReader.readLine() 메서드를 사용하여 입력 스트림 또는 오류 스트림을 한 줄씩 읽는다.
각 줄은 "response"라는 StringBuffer 객체에 추가되며, 모든 줄을 읽은 후에는 BufferedReader를 닫는다.
HTTP 요청의 결과는 response 객체의 내용이다. 이 객체에는 서버에서 반환된 응답 본문이 들어 있다.
우리는 앞서 JSON으로 요청했기 때문에 응답 본문은 JSON 형식이며, 파싱이 필요하다.
5️⃣ JSON 파싱하기
JSON 데이터의 구조에 맞게 파싱하기 위하여
이를 위해 build.gradle에 라이브러리를 추가한다.
implementation 'org.json:json:20230227'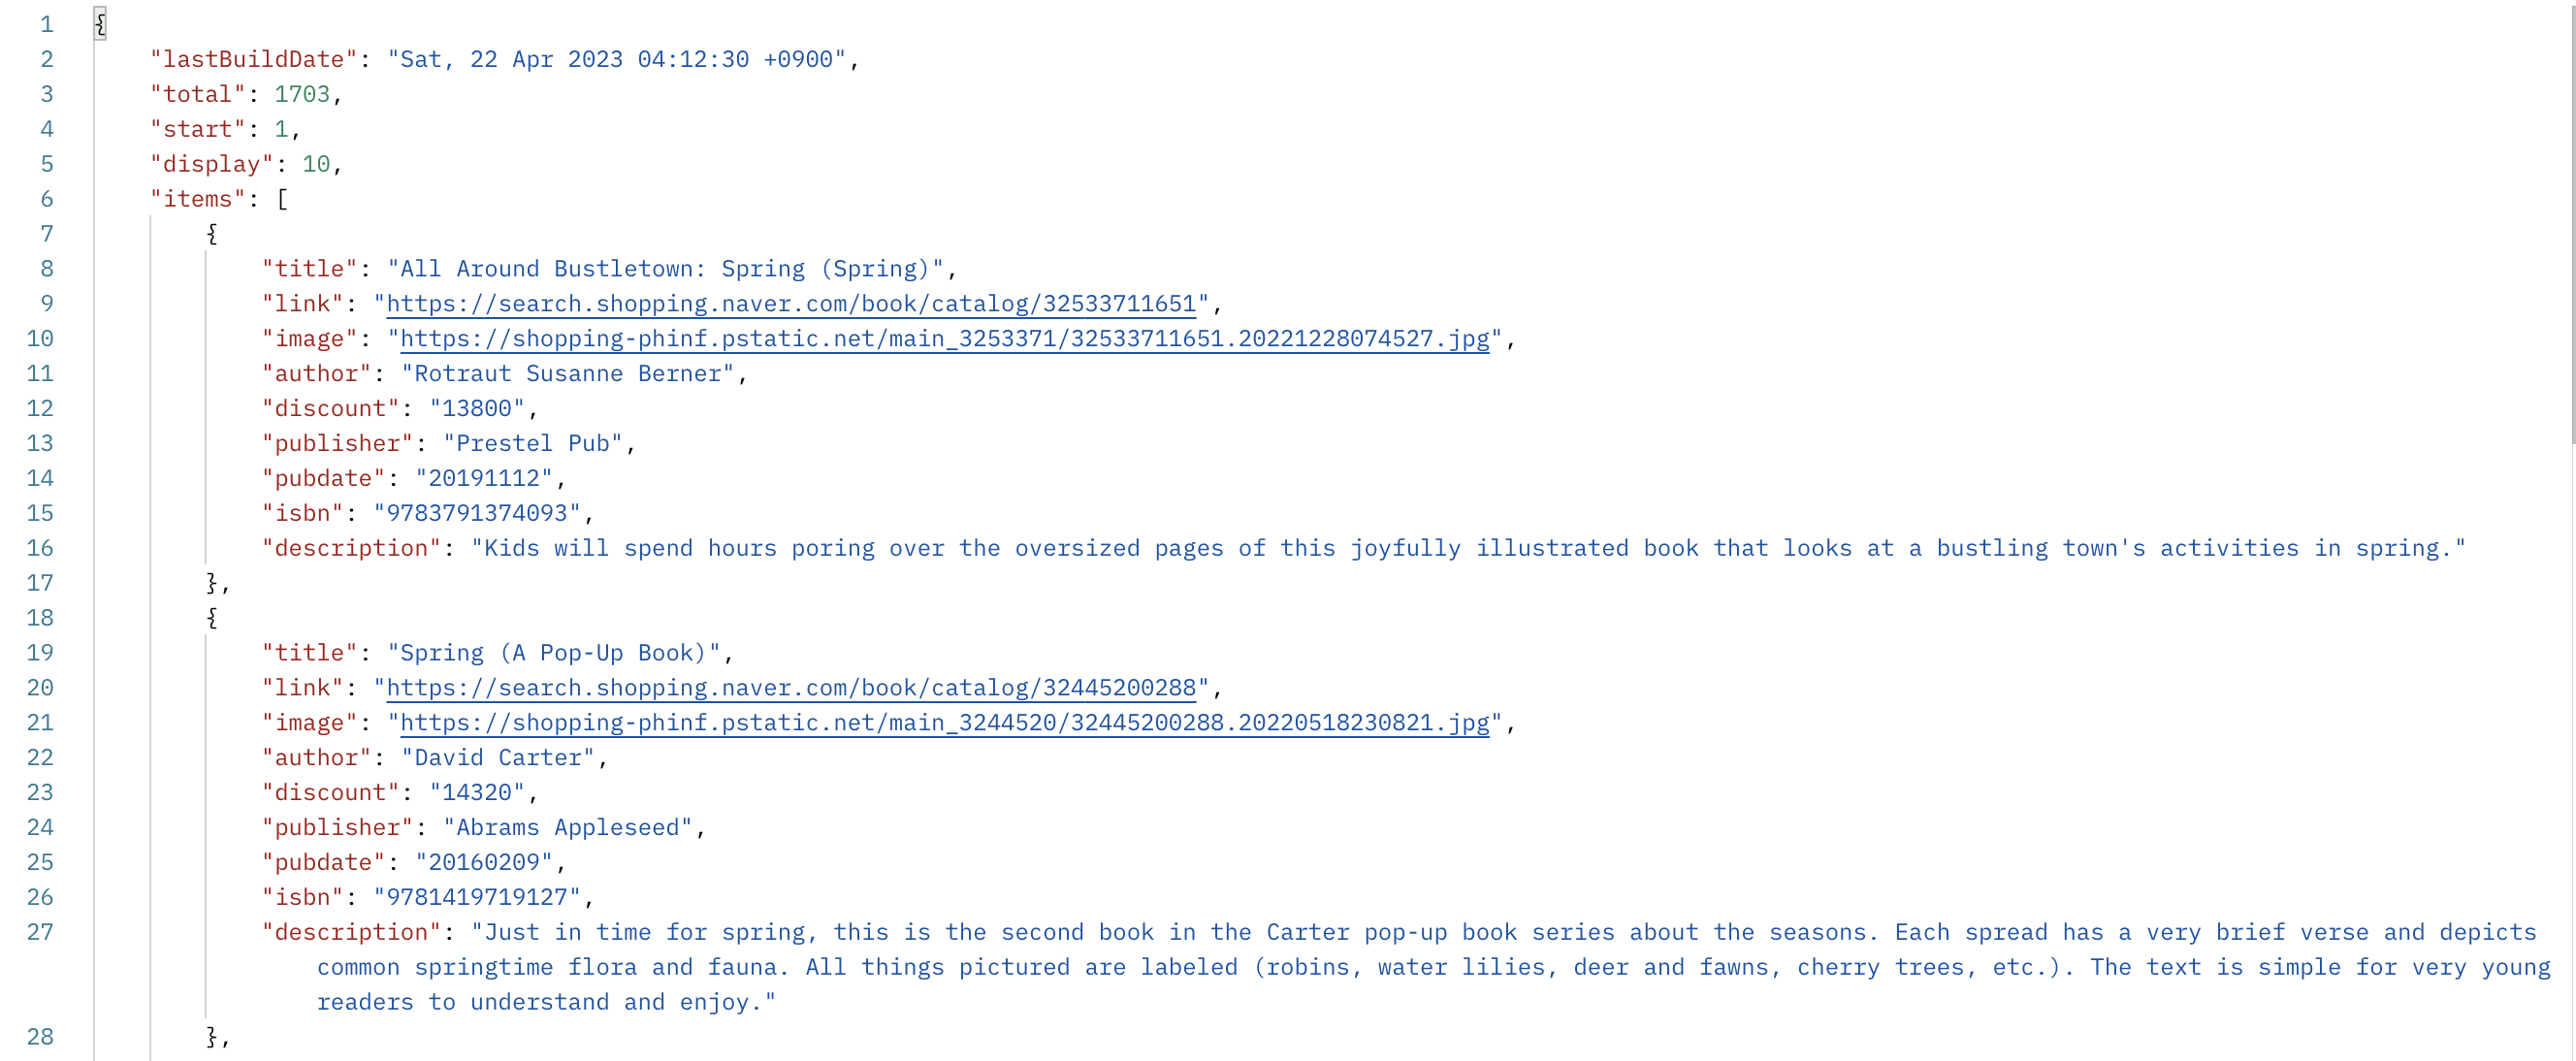
응답 JSON JSONObject jsonObject = new JSONObject(response.toString()); JSONArray jsonArray = (JSONArray) jsonObject.get("items"); List<BookDto> bookDtoList = new ArrayList<>(); for (int i = 0; i < jsonArray.length(); i++) { JSONObject obj = jsonArray.getJSONObject(i); String title = obj.getString("title"); String author = obj.getString("author"); String image = obj.getString("image"); bookDtoList.add(BookDto.builder() .title(title) .author(author) .imageURL(image).build()); } model.addAttribute("bookDtoList", bookDtoList);
여기까지 진행하면 기본적인 API 사용하는 과정은 끝난다.
나는 추가적으로 thymeleaf로 도서 검색 서비스를 구현할 것이다.

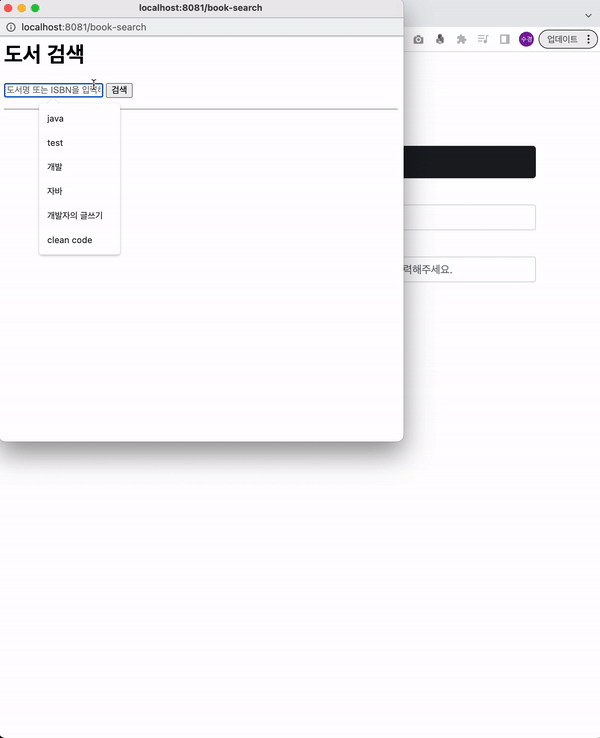
작동 예시 - 홈에는 책 정보(제목, 저자, 이미지URL) 입력 폼이 있다.
- 검색 버튼을 누르면 검색 팝업창이 뜬다.
- 키워드를 검색하여 나오는 결과에서 요소를 선택하면, 홈의 입력 폼에 선택한 책의 정보가 입력된다.
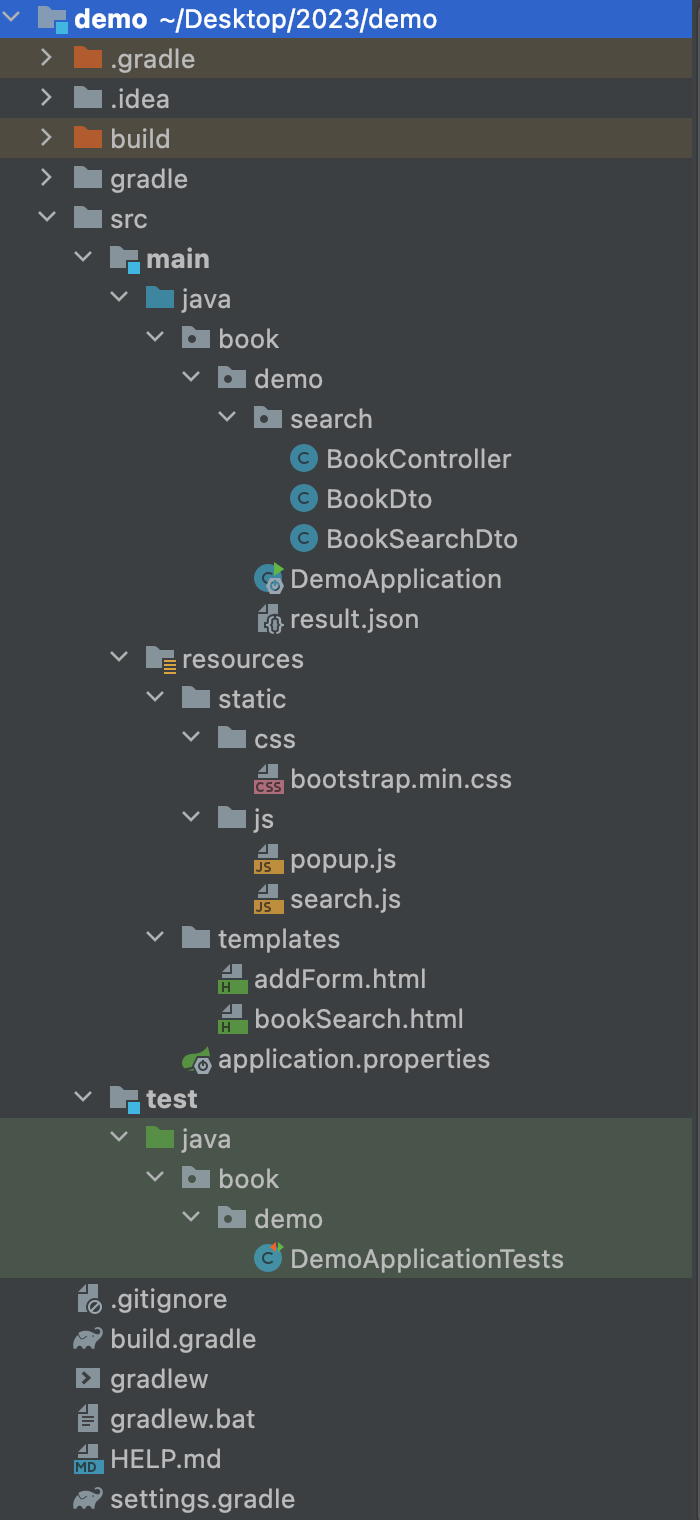
전체 프로젝트 구조
6️⃣ DTO 구현
BookDto
@Getter
@ToString
@NoArgsConstructor
public class BookDto {
    private Long id;
    private String title;
    private String author;
    private String imageURL;

    @Builder
    public BookDto(String title, String author, String imageURL) {
        this.title = title;
        this.author = author;
        this.imageURL = imageURL;
    }
}
7️⃣ Controller 구현
BookController
@Controller
public class BookController {

    // 네이버 도서 검색 api key
    private final String CLIENT_ID = "발급받은 CLIENT_ID";
    private final String CLIENT_SECRET = "발급받은 CLIENT_SECRET";


    @GetMapping("/")
    public String home(Model model) {
        model.addAttribute("board", new BookDto());
        return "addForm";
    }

    @GetMapping("/book-search")
    public String BookSearchHome(Model model) {
        String keyword = "";
        model.addAttribute("keyword", keyword);
        return "bookSearch";
    }

    @PostMapping("/book-search")
    public String search(@ModelAttribute("keyword") String keyword, Model model) {
        try {
            String encodedKeyword = URLEncoder.encode(keyword, "UTF-8");
            String apiURL = "https://openapi.naver.com/v1/search/book.json?query=" + encodedKeyword;
            URL url = new URL(apiURL);
            HttpURLConnection con = (HttpURLConnection) url.openConnection();
            con.setRequestMethod("GET");
            con.setRequestProperty("X-Naver-Client-Id", CLIENT_ID);
            con.setRequestProperty("X-Naver-Client-Secret", CLIENT_SECRET);
            int responseCode = con.getResponseCode();
            BufferedReader br;
            if (responseCode == 200) { // 정상 호출
                br = new BufferedReader(new InputStreamReader(con.getInputStream()));
            } else {  // 에러 발생
                br = new BufferedReader(new InputStreamReader(con.getErrorStream()));
            }
            String inputLine;
            StringBuffer response = new StringBuffer();
            while ((inputLine = br.readLine()) != null) {
                response.append(inputLine);
            }
            br.close();


            JSONObject jsonObject = new JSONObject(response.toString());
            JSONArray jsonArray = (JSONArray) jsonObject.get("items");
            List<BookDto> bookDtoList = new ArrayList<>();

            for (int i = 0; i < jsonArray.length(); i++) {
                JSONObject obj = jsonArray.getJSONObject(i);
                String title = obj.getString("title");
                String author = obj.getString("author");
                String image = obj.getString("image");

                bookDtoList.add(BookDto.builder()
                        .title(title)
                        .author(author)
                        .imageURL(image).build());
            }
            model.addAttribute("bookDtoList", bookDtoList);

        } catch (Exception e) {
            e.printStackTrace();
        }

        return "bookSearch";
    }
}
8️⃣ template 구현
addForm.html
<!DOCTYPE HTML>
<html xmlns:th="http://www.thymeleaf.org">
<head>
    <meta charset="utf-8">
    <link th:href="@{/css/bootstrap.min.css}" href="../css/bootstrap.min.css" rel="stylesheet">
</head>

<body>
<div class="container">
    <div class="board_wrap">
        <form action="board.html" th:action th:object="${board}" method="post">
            <div class="py-5 text-center">
                <h2>네이버 도서 검색 API 활용</h2>
            </div>
            <div class="board_write_wrap">

                <button class="w-100 btn btn-dark btn-lg" onclick="openPopup()" type="button" style="margin-bottom: 15px;">검색</button>

                <script th:src="@{/js/popup.js}"></script>

                <div class="board_write">
                    <div class="title">
                        <label for="add_form_title" th:text="title">title</label>
                        <input id="add_form_title" th:field="*{title}" class="form-control"
                               placeholder="책의 제목을 입력해주세요." style="margin-bottom: 15px;">
                    </div>
                    <div class="row">
                        <div class="col">
                            <label for="add_form_authorr" th:text="author">author</label>
                            <input id="add_form_author" th:field="*{author}" class="form-control"
                                   placeholder="책의 저자를 입력해주세요." style="margin-bottom: 15px;">
                        </div>
                        <div class="col">
                            <label for="add_form_imageURL" th:text="imageURL">imageURL</label>
                            <input id="add_form_imageURL" th:field="*{imageURL}" class="form-control"
                                   placeholder="책의 표지 URL을 입력해주세요."/>
                        </div>
                    </div>
                </div>
            </div>
        </form>
    </div>
</div>
</body>
</html>
bookSearch.html
<div id="popup">   <!-- 팝업 -->

    <html xmlns:th="http://www.thymeleaf.org">
    <head>
        <style>
            table {
                width: 100%;
                border-collapse: collapse;
            }

            th, td {
                border-bottom: 1px solid #555555;
                padding: 10px;
            }
        </style>

    </head>
    <body>
    <script th:src="@{/js/search.js}"></script>
    <div class="col-md-12">
        <h1>도서 검색</h1>
        <div class="col-md-4">
            <form th:action="@{/book-search}" method="post">
                <input type="text" th:value="${keyword}" name="keyword" placeholder="도서명 또는 ISBN을 입력해주세요.">
                <button th:text="검색" type="submit"/>
            </form>
        </div>

        <hr>
        <div>
            <table class="table">
                <tbody>
                <tr th:each="bookDto : ${bookDtoList}" onclick="selectElement(this)" style="cursor : pointer;" \>
                    <td><img th:src="@{${bookDto.imageURL}}" width="100" height="150"/></td>
                    <td th:text="${bookDto.title}">title</td>
                    <td th:text="${bookDto.author}">authorA</td>
                </tr>
                </tbody>
            </table>
        </div>
    </div>
    </body>
    </html>
</div>
9️⃣ javascript 구현
popup.js
function openPopup() {
    var popup = window.open("/book-search", "도서 검색", "width=600, height=600");
    popup.focus();
}
openPopup() ➡️ addForm.html에서 검색 버튼을 클릭하면 호출되는 함수이다.
window.open을 호출하여 "/book-search"라는 path를 가진 새로운 팝업 창을 띄워 준다.
search.js
function selectElement(selectedElement) {
    addDataToForm(selectedElement);
    window.close();
}

// 선택된 데이터를 add form 에 추가하는 함수
function addDataToForm(ele) {
    console.log('addDateToForm' + ele);

    let elements = ele.getElementsByTagName("td");
    let data = {
        title: elements[1].innerText,
        author: elements[2].innerText,
        imageURL: elements[0].querySelector('img').getAttribute('src')
    };

    // 부모 창으로 element 전달
    opener.document.getElementById("add_form_imageURL").value = data.imageURL;
    opener.document.getElementById("add_form_title").value = data.title;
    opener.document.getElementById("add_form_author").value = data.author;

}
selectElement(selectedElement) ➡️ 검색 팝업 창(bookSearch.html)에서 책 요소를 선택하면 호출되는 함수이다.
addDataToForm 함수를 호출하고 팝업 창을 닫는다.
addDataToForm(ele) ➡️ selectElement로부터 전달받은 선택한 책 요소는 html로 구성되어 있다.
적절한 함수를 사용하여 title, author, imageURL을 추출한 후, id로 찾은 부모 창의 element에 값을 전달한다.
끝 !
 728x90
'Spring' 카테고리의 다른 글
[Spring] JWT(Json Web Token)란? | 구조, 암호화 방법, 장단점 (0) 2023.06.14 [Spring] 테스트 코드에서의 @Transactional 사용 (0) 2023.05.30 [Spring] Spring boot가 자동 등록하는 HandlerMapping과 HandlerAdapter (0) 2023.03.14 [Spring] Cannot resolve taglib with uri http://java.sun.com/jsp/jstl/core (0) 2023.03.09 [Spring] 리소스를 식별하는 통일된 방식 | URI, URL, URN (0) 2023.03.02
